messageCross Icon
Cross Icon
Web Application Development

Permission-Based Access Control in Vue Using JWT, Directives & Route Guards

Permission-Based Access Control in Vue Using JWT, Directives & Route Guards

In modern web applications, controlling what each user can see and do is crucial for both security and usability. Whether you’re building a SaaS dashboard or an internal tool, role-based and permission-based access control is a must-have feature

In this blog, I’ll walk you through how I implemented permission-based access control in a Vue 3 application using:

  • JWT tokens from the backend
  • Custom directives for disabling UI
  • Route guards for blocking unauthorized navigation

This setup provides robust control without cluttering your components.

The Goal to:

  • Decode user permissions from a JWT token
  • Enable/disable UI actions based on those permissions
  • Show tooltips when features are disabled
  • Hide restricted features entirely
  • Block unauthorised routes via router guards

Permissions Design

The backend sends a JWT token with a permissions object embedded:

Code

{
  "permissions": {
    "dashboardAnalytics": "full",
    "projectSettings": "readonly",
    "userManagement": "denied"
  }
}
      

Each permission can be:

  • full – full access
  • readonly – can view, not modify
  • denied – cannot access at all

1. Decoding JWT & Managing Permissions

Store the permissions in a reactive ref:

Code

// @utils/permission.ts
import { ref } from 'vue'

export const permissionList = ref>({})
export const getAllPermissions = (() => {
    const apiToken = document.cookie
        .split('; ')
        .find(row => row.startsWith('api_token='))
        ?.split('=')[1]
    if (apiToken) {
        const [, payload] = apiToken.split('.')
        if (payload) {
            const decodedPayload = JSON.parse(
                atob(payload.replace(/-/g, '+').replace(/_/g, '/'))
            )
            permissionList.value = decodedPayload.permissions || {}
        }
    }
})()
export const hasPermission = (permission: string): boolean => {
    const permValue = permissionList.value?.[permission]
    if (permValue === undefined) return true
    return permValue === 'full'
}
export const hasPermissionDenied = (permission: string): boolean => {
    return permissionList.value?.[permission] === 'denied'
}        
      

The getAllPermissions() function should be called during app initialization (e.g., in main.ts or after login).

2. Vue Directive: v-permission

We created a custom Vue directive to apply permission logic declaratively to components.

Code

// @directives/permission.ts
import { hasPermission } from '@utils/permission'


export default {
    mounted(el, binding) {
        const permission = typeof binding.value === 'string' ? binding.value : ''
        const tooltipMessage = 'You do not have permission to access this feature.'
        if (permission && !hasPermission(permission)) {
            el.setAttribute('disabled', 'true')
            el.classList.add('tw-cursor-not-allowed', '!tw-opacity-50')
            el.style.cursor = 'not-allowed'
            let tooltipEl: HTMLElement | null = null
            const showTooltip = () => {
                tooltipEl = document.createElement('div')
                tooltipEl.classList.add('custom-tooltip')
                tooltipEl.textContent = tooltipMessage
                document.body.appendChild(tooltipEl)
                const rect = el.getBoundingClientRect()
                const tooltipHeight = tooltipEl.offsetHeight
                const spaceAbove = rect.top
                tooltipEl.style.top = spaceAbove >= tooltipHeight + 6
                    ? `${rect.top - tooltipHeight - 6 + window.scrollY}px`
                    : `${rect.bottom + 6 + window.scrollY}px`
                tooltipEl.style.left = `${rect.left + rect.width / 2 - tooltipEl.offsetWidth / 2 + window.scrollX}px`
            }
            const hideTooltip = () => {
                if (tooltipEl) {
                    tooltipEl.remove()
                    tooltipEl = null
                }
            }
            el.addEventListener('mouseenter', showTooltip)
            el.addEventListener('mouseleave', hideTooltip)
            el.addEventListener('focus', showTooltip)
            el.addEventListener('blur', hideTooltip)
            const blocker = (e: Event) => {
                e.preventDefault()
                e.stopImmediatePropagation()
            }
            el.addEventListener('click', blocker, true)
            el.addEventListener('mousedown', blocker, true)
            el.addEventListener('keydown', blocker, true)
        }
    },
}        
      

Usage in Components

Here’s how you’d use it in your template:

Code

<Button
v-permission="'dashboardAnalytics'"
@click="addWidget"
label="Add Widget"
class="btn"
/>
      

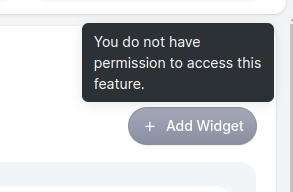
If the user lacks permission, the button will be:

  • Disabled
  • Semi-transparent
  • Unclickable
  • Showing a tooltip

3. Conditionally Hiding UI with v-if

For fully denied permissions, you can use:

Code

<Button
v-if="!hasPermissionDenied('userManagement')"
@click="openUserManager"
label="Manage Users"
/>
      

This hides the button completely if access is explicitly denied.

4. Securing Routes with Router Guards

To prevent users from manually navigating to protected routes, we add permission metadata and guard logic.

Hire Now!

Hire Vue.js Developers Today!

Ready to bring your web application vision to life? Start your journey with Zignuts expert Vue.js developers.

**Hire now**Hire Now**Hire Now**Hire now**Hire now

Sample usage:

Code

{
  path: '/:orgId/:projectId/dashboard-analytics',
  name: 'dashboard-analytics',
  meta: {
    layout: 'default',
    permission: 'dashboardAnalytics',
  },
  component: () => import('@pages/analytics/index.vue'),
}
      

Global Navigation Guard

Code

// router.ts
import { hasPermissionDenied } from '@utils/permission'

router.beforeEach((to, from, next) => {
    const permissionKey = to?.meta?.permission
    const permissionDenied = permissionKey && hasPermissionDenied(permissionKey as string)
    if (permissionDenied) {
        if (to.name !== 'access-denied') {
            return next({ name: 'access-denied' })
        }
        return next()
    }
    NProgress.start()
    next()
})        
      

Access Denied Route

Code

{
  path: '/access-denied',
  name: 'access-denied',
  component: () => import('@pages/common/AccessDenied.vue'),
  meta: {
    layout: 'minimal',
  },
}
      

Results 

With this setup:

  • Unauthorized users can’t see or interact with restricted UI
  • Routes are blocked at the navigation layer
  • Users get clear feedback via tooltips or redirection
  • Templates stay clean and declarative

Final Thoughts

This approach strikes a great balance between security, usability, and maintainability. You can easily extend it further to support:

  • Role-based logic
  • Multi-tenant permissions
  • Asynchronous permission loading

Action buttons look like:
Action Button
card user img
Twitter iconLinked icon

A passionate problem solver driven by the quest to build seamless, innovative web experiences that inspire and empower users.

card user img
Twitter iconLinked icon

Passionate developer with expertise in building scalable web applications and solving complex problems. Loves exploring new technologies and sharing coding insights.

Book a FREE Consultation

No strings attached, just valuable insights for your project

Valid number
Please complete the reCAPTCHA verification.
Claim My Spot!
Thank you! Your submission has been received!
Oops! Something went wrong while submitting the form.
download ready
Thank You
Your submission has been received.
We will be in touch and contact you soon!
View All Blogs