


.svg)

.svg)


.svg)
.svg)


.webp)
Deploying your Node.js App on AWS doesn’t have to be complicated. In this comprehensive guide, you’ll learn how to launch a virtual machine using AWS EC2, containerize your app with Docker, set up a reverse proxy using Nginx, and secure it with SSL using Certbot.
As of 2026, modern web deployment has shifted toward maximum portability and security. By combining the elastic scalability of AWS with Docker’s containerization, you ensure that your application environment remains identical from your local laptop to the cloud. Adding Nginx into the mix provides a high-performance layer that handles heavy traffic and SSL termination, while Certbot automates the once-tedious task of maintaining security certificates.
Whether you are launching a production-grade API or a personal project, this stack provides the perfect balance of control, performance, and cost-efficiency. This tutorial will walk you through the entire lifecycle from provisioning raw hardware in the Amazon cloud to a fully encrypted, live URL accessible to the world.
What is AWS?
Amazon Web Services (AWS) is the world’s most widely adopted cloud platform, offering over 200 fully featured services from data centers globally. It provides a highly reliable, scalable, and low-cost infrastructure platform in the cloud that powers hundreds of thousands of businesses in 190 countries around the world.
For developers launching a Node.js App on AWS, the platform acts as a virtual data center where you can choose the specific software stack you need. Instead of the massive upfront capital expenses associated with building and maintaining physical hardware, you transition to a variable expense model, paying only for the computing resources you actually consume.
Instead of setting up and managing physical servers, AWS allows you to:
- Launch virtual machines in seconds (EC2): Spin up Linux or Windows servers instantly to host your application code and environment.
- Store files securely (S3): Utilize Simple Storage Service for hosting static assets, user uploads, or backups with 99.999999999% durability.
- Use databases without server management (RDS): Run managed relational databases like PostgreSQL or MySQL that handle patching, backups, and scaling automatically.
- Deploy globally with minimal latency: Use the AWS global backbone to put your application closer to your end-users, reducing load times and improving the user experience.
- Advanced Security and Compliance: Benefit from a "Shared Responsibility Model" where AWS secures the underlying infrastructure, while providing you with robust tools like IAM (Identity and Access Management) to control exactly who can access your code and data.
What is EC2?
Amazon EC2 (Elastic Compute Cloud) is a virtual server hosted on the AWS cloud. It allows you to run applications just like you would on your own physical machine, but with flexibility, scalability, and global reach. It is the fundamental building block for hosting a Node.js App on AWS, providing the raw "compute" power required to execute your code.
The "Elastic" in EC2 refers to the ability to resize your computing capacity within minutes. Whether your application is handling ten users or ten million, you can scale your instance specifications up or down to meet demand. This elasticity ensures you aren't paying for idle hardware during quiet hours, nor are you crashing during high-traffic spikes.
Key Features of EC2:
- Complete Control:
You have root access to every instance, allowing you to interact with them as you would any server. This gives you the freedom to install any software, including Docker and Nginx, exactly as needed for your specific project requirements. You can choose your preferred Operating System (like Ubuntu 24.04 LTS), manage system-level configurations, and optimize the environment specifically for the Node.js runtime.
- Diverse Instance Types:
AWS offers a massive selection of instance types optimized for different use cases, including compute-optimized, memory-optimized, and accelerated computing. For a standard Node.js App on AWS, the T-series (like t3.micro or t4g.small) provides a balanced mix of CPU and memory that is cost-effective for most web services. These burstable instances allow you to handle sudden spikes in traffic without the high cost of dedicated high-end hardware.
- Security and Networking:
Instances are located within a Virtual Private Cloud (VPC), giving you a logically isolated section of the network. You can define custom "Security Groups" that act as a virtual firewall, controlling exactly which ports (like 80 for HTTP or 443 for HTTPS) are open to the public internet. This granular control allows you to white-list specific IP addresses for SSH access while keeping your application ports open to the world.
- Storage Flexibility:
You can attach high-performance EBS (Elastic Block Store) volumes to your instances. This persistent storage behaves like a physical hard drive, ensuring your data remains intact even if the instance is stopped or restarted. You can also take snapshots of these volumes to create backups or replicate your environment across different availability zones in seconds.
- Global Availability:
You can launch instances in any AWS Region or Availability Zone worldwide. This allows you to host your application in a location physically closest to your target audience, significantly reducing latency and improving site speed. By spreading instances across multiple Availability Zones, you can also build a highly available architecture that stays online even if one data center experiences an outage.
- Pay-as-You-Go Model:
With EC2, you eliminate the need to invest in expensive hardware upfront. You are billed based on the capacity you use, with options for "On-Demand" pricing for flexibility, or "Reserved Instances" and "Savings Plans" to significantly reduce costs for long-term projects. This makes it as accessible for a solo developer as it is for a global enterprise.
What is Docker and Why Use It?
Docker allows you to bundle your application and its dependencies into a single package, called a container. This means you don't need to worry about whether certain libraries or software are installed on the server; the container has everything it needs. When deploying a Node.js App on AWS, Docker acts as the ultimate bridge between your local development machine and the cloud.
In 2026, containerization is no longer just a trend; it is the industry standard for shipping software. By using Docker, you are essentially creating a lightweight, portable snapshot of your entire system. This includes the Node.js runtime, your node_modules, system tools, and even specific OS-level configurations. This eliminates the "drift" that often happens when a server's background libraries are updated, which can unexpectedly break an application that was working perfectly just hours before.
Benefits:
- Consistency across development and production:
Docker ensures that the exact same environment used by the developer is recreated on the AWS EC2 instance. This eliminates the "it works on my machine" excuse, as the container behaves identically regardless of the underlying hardware or host operating system.
- Easy to deploy and scale:
Because containers are lightweight and share the host’s kernel, they start up in seconds. For a Node.js App on AWS, this means you can quickly launch additional containers to handle traffic spikes or roll back to a previous version of your app instantly if a new release has bugs.
- Isolated environments for running apps:
Each Docker container runs in its own isolated user space. You can run multiple versions of Node.js or even entirely different applications (like a Python microservice or a Redis cache) on the same EC2 instance without them interfering with each other's dependencies or ports.
- Resource Efficiency:
Unlike traditional Virtual Machines (VMs) that require a full guest operating system for every instance, Docker containers are extremely efficient. They use fewer system resources (RAM and CPU), allowing you to run more services on a smaller, cheaper EC2 instance like a t3.micro.
- Simplified Dependency Management:
With a Dockerfile, your setup process is documented as code. You no longer need to remember a long list of manual installation commands for your server; the Dockerfile automates the entire environment setup every time you build the image.
Why Use Nginx?
Nginx is a high-performance web server that is commonly used as a reverse proxy. While Node.js has its own built-in HTTP module, it is not designed to handle the complexities of a production-facing web environment alone. In this setup, Nginx acts as a "traffic controller" that sits between the public internet and your application.
By deploying a Node.js App on AWS, Nginx serves as a robust shield and optimizer. It allows you to decouple the "web-serving" tasks from your "application-logic" tasks.
In this setup:
- Your application will run on port 3000 inside a Docker container: This keeps the app isolated and secure. Instead of exposing your internal application ports directly to the world, they remain reachable only by the Nginx process on the same host.
- Nginx listens on the default web ports (80 for HTTP and 443 for HTTPS): As of 2026, web standards strictly require HTTPS. Nginx is optimized to manage these standard entry points efficiently, routing traffic based on the domain name or URL path.
- Nginx forwards incoming requests to your app: This keeps your infrastructure clean and makes adding SSL easy. Because Nginx is built on an event-driven, non-blocking architecture, it can handle thousands of concurrent connections with a very low memory footprint, far lower than Node.js would use if it were managing those raw connections directly.
Additional Benefits for a Node.js App on AWS:
- SSL/TLS Termination: Handling encryption (SSL) is computationally expensive. By letting Nginx handle the SSL handshake, your Node.js application is freed up to focus entirely on executing your business logic.
- Static Content Acceleration: Nginx is significantly faster than Node.js at serving static files like images, CSS, and JavaScript. You can configure Nginx to serve these files directly from the disk, so the request never even has to hit your Node.js container.
- Buffering and Slow Clients: Nginx acts as a buffer. If a user has a slow 3G connection, Nginx will "absorb" the response from your fast Node.js app and slowly drip-feed it to the client. This prevents your Node.js processes from being "held hostage" by slow internet connections.
- Security Layering: Nginx provides an extra layer of defense against common attacks. You can easily implement rate-limiting, IP whitelisting, and custom security headers (like HSTS and X-Frame-Options) within the Nginx configuration to protect your Node.js App on AWS from DDoS attacks and unauthorized scraping.
- Load Balancing Readiness: Even if you start with one container, Nginx makes it easy to scale. If you later decide to run three copies of your app to handle more traffic, you simply update one line in the Nginx config to distribute traffic across all three.
Ready to bring your server-side application vision to life? Start your journey with Zignuts expert Node.js developers.
**Hire now**Hire Now**Hire Now**Hire now**Hire now

What is SSL and Why Use Certbot for a Node.js App on AWS?
SSL (Secure Sockets Layer), now technically succeeded by TLS (Transport Layer Security), is the global standard security technology for establishing an encrypted link between a web server and a browser. When you deploy a Node.js App on AWS, SSL ensures that all data passed between the server and the visitor remains private and integral.
In the modern web landscape of 2026, SSL is no longer a luxury; it is a mandatory requirement. Without it, browsers like Chrome and Safari will flag your site as "Not Secure," significantly damaging your credibility and user retention. Furthermore, search engines like Google prioritize HTTPS-enabled websites, meaning SSL is essential for your application's visibility and SEO.
Certbot is a free, open-source, and automated tool designed to simplify the process of using Let’s Encrypt certificates. Let’s Encrypt is a non-profit certificate authority that provides digital certificates to enable HTTPS for free. Certbot acts as the bridge that manages these certificates on your EC2 instance.
Why SSL and Certbot are Essential:
- Encryption of Sensitive Data:
SSL protects sensitive information such as login credentials, credit card numbers, and personal details by encrypting the data stream. This prevents "Man-in-the-Middle" (MitM) attacks where hackers attempt to eavesdrop on the connection.
- Automated Lifecycle Management:
Traditional SSL certificates were expensive and required manual renewal every year. Certbot automates this entire lifecycle. Once configured on your AWS instance, it periodically checks for expiration and renews the certificate in the background without any manual intervention.
- Data Integrity:
SSL ensures that the data being sent to the user has not been altered or corrupted by a third party during transit. This "checksum" verification guarantees that the user sees exactly what your Node.js app intended to send.
- Improved Performance with HTTP/3:
Modern web protocols like HTTP/2 and HTTP/3 require encryption to function. By setting up SSL via Nginx, you unlock these faster protocols, which can significantly reduce page load times for your users.
- Building Brand Trust:
The "padlock" icon in the address bar is a universal symbol of safety. For any professional service, this visual cue is vital for building trust with your audience and ensuring they feel comfortable interacting with your platform.
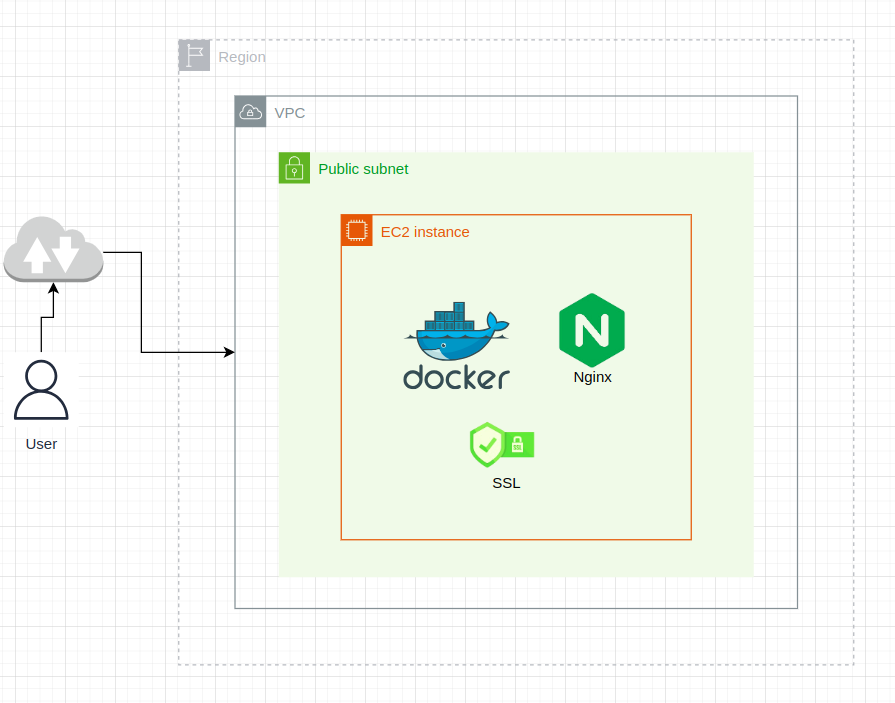
Architecture Diagram
Step 1: Launch an EC2 Instance for Your Node.js App on AWS
Setting up the virtual hardware is the first physical step in getting your application live. By following these steps, you are essentially renting a slice of a high-performance data center managed by Amazon.
- Log in to the AWS Management Console: Access your account and ensure you have the necessary permissions to create resources.
- Region Selection: Choose the region closest to your target audience (e.g., ap-south-1 for Mumbai or us-east-1 for North Virginia). Reducing the physical distance between your server and your users is the easiest way to lower latency.
- Navigate to EC2 > Launch Instance: This opens the setup wizard, where you define your server's specifications.
Set the following configuration:
- Name: nodejs-server (or any identifier that helps you recognize this resource later).
- AMI (Amazon Machine Image): Select Ubuntu Server 24.04 LTS. As of 2026, this version is the gold standard for stability and long-term security support. It comes pre-optimized for cloud environments and has excellent compatibility with Docker.
- Instance Type: t2.micro or t3.micro. If you are within your first year of AWS, these are "Free Tier" eligible. They provide enough burstable CPU performance to run a containerized Node.js environment comfortably for small to medium projects.
- Key Pair: This is your "digital key" to the server. Create a new key pair, download the .pem file, and keep it safe. Without this file, you will be locked out of your server, as AWS does not store a copy of your private key.
Configure the Security Group
The Security Group acts as your server's virtual firewall. By default, AWS blocks all incoming traffic to protect you. You must explicitly open "doors" (ports) to allow users to reach your Node.js App on AWS.
- Port 22 (SSH): This allows you to connect to the server's terminal from your own computer. For maximum security, you can set the "Source" to "My IP" so that only you can attempt to log in.
- Port 80 (HTTP): This is the standard port for web traffic. Nginx will listen here to catch initial requests from users.
- Port 443 (HTTPS): This is the secure port. Once we set up Certbot, all your encrypted traffic will flow through this port.
Pro Tip: If you forget to open Port 80 or 443, your server might be running perfectly, but the browser will show a "Connection Refused" error. Always double-check these inbound rules if your site isn't loading.
Finalizing the Launch
- Storage: The default is usually 8 GB (General Purpose SSD - gp3). The GP3 volumes are recommended in 2026 because they offer better baseline performance (IOPS) than the older GP2 volumes at no extra cost.
- Network: Stick with the Default VPC and Subnet for now. This ensures your instance is assigned a Public IP address so it can communicate with the internet.
- Summary: Review your settings on the right-hand panel and click Launch Instance.
Connect to Your EC2 Instance
Once the instance status shows “running” in your AWS console, your virtual server is officially powered on and ready to receive instructions. However, because AWS prioritizes security, you cannot simply log in with a username and password. Instead, you must use the private key pair you downloaded during the setup phase.
To establish a secure tunnel to your Node.js App on AWS, follow these precise steps:
- Locate your Key Pair: Go to your Downloads folder (or the specific directory where your .pem key was saved).
- Secure the Key File: Linux and macOS systems require that your private key file is not "publicly viewable" for the SSH connection to be considered secure. If the permissions are too open, the SSH client will reject the key. Run the following command to restrict access:
- Establish the Connection: Now, use the SSH protocol to log into the remote Ubuntu environment. You will need your instance's Public IPv4 Address, which can be found in the EC2 Instance Summary dashboard.
Now connect to your server using SSH:
What happens during this step?
- The "ubuntu" User: By default, Ubuntu AMIs on AWS use ubuntu as the administrative user. This user has sudo privileges, allowing you to install software like Docker and Nginx.
- Fingerprint Verification: The first time you connect, your terminal will ask if you "trust the host." Type yes and hit enter. This saves the server's fingerprint to your known_hosts file, ensuring you are connecting to the correct machine in the future.
- The Welcome Prompt: Once successful, your terminal prompt will change from your local machine name to something like ubuntu@ip-172-31-xx-xx. This signifies you are now operating directly inside your AWS cloud environment.
Install Docker, Nginx, and Certbot
Now that you have gained access to your virtual server, it is time to transform it into a production-ready environment. We will install a specialized stack of software designed to keep your Node.js App on AWS fast, secure, and isolated.
By running these commands, you are preparing the "containers" (Docker), the "gatekeeper" (Nginx), and the "security guard" (Certbot). As of 2026, these tools remain the industry standard for reliability and ease of maintenance.
1. Update the server:
Before installing new software, it is vital to ensure your Ubuntu system has the latest security patches and repository listings. This prevents compatibility issues with modern dependencies.
2. Install Docker:
Docker will serve as the engine that runs your application. By enabling it with systemctl, you ensure that if your EC2 instance ever reboots (for example, during AWS maintenance), your Docker service will start back up automatically.
3. Install Nginx:
Nginx acts as your high-performance web server. While Docker handles the application logic, Nginx will handle the incoming web traffic from the outside world. Just like Docker, we enable it to ensure it survives a system restart.
4. Install Certbot (for SSL):
To secure your Node.js App on AWS, we need Certbot. This specific package includes the Nginx plugin, which allows Certbot to read your web server configuration and automatically apply SSL certificates without you having to edit complex text files manually.
Why this order matters:
- Updating first ensures you are pulling the 2026 versions of these tools, which include optimizations for the latest CPU architectures used by AWS.
- Installing Nginx before Certbot is required because Certbot needs to see an active Nginx installation to verify your domain ownership.
- Enabling services via systemctl is a "set it and forget it" best practice that guarantees high availability for your application.
Deploy Node.js App with Docker
Containerizing your application is the most reliable way to ensure it runs perfectly on AWS. By using Docker, you package your code, runtime, and dependencies into a single immutable image. In 2026, using Node 24 (Krypton) is the standard for production apps, offering enhanced performance and long-term security support.
Essential Project Files
To deploy successfully, your project directory must contain these three core files:
- server.js: Your application entry point (e.g., an Express.js server).
- package.json: The manifest of your dependencies and scripts.
- Dockerfile: The "recipe" that tells Docker how to build your image.
Optimized Dockerfile
This Dockerfile uses industry best practices, such as copying package.json separately to leverage Docker Layer Caching. This ensures that if you only change your code (and not your dependencies), the build process takes seconds rather than minutes.
Deploy your app on EC2:
Once your files are ready, you need to pull them onto your EC2 instance. Most developers use Git for this process, as it allows for easy updates and version control. After cloning, you will build the "Image," which is a read-only template, and then start the "Container," which is the live, running instance of that image.
Key Breakdown of the Deployment Commands:
- docker build: The -t node-app flag tags your image with a friendly name. The. tells Docker to look for the Dockerfile in the current directory.
- docker run -d: The -d flag runs the container in "detached" mode. This means the app will keep running in the background even if you close your SSH terminal window.
- -p 3000:3000: This maps port 3000 of your EC2 instance to port 3000 inside the Docker container. This is crucial for making your Node.js App on AWS accessible to the Nginx proxy we will set up next.
Then visit: http://<your-ec2-public-ip>:3000
Ready to bring your server-side application vision to life? Start your journey with Zignuts expert Node.js developers.
**Hire now**Hire Now**Hire Now**Hire now**Hire now
Set Up Nginx as a Reverse Proxy
To expose your app on port 80 with a clean URL:
By default, users would have to type your IP address followed by:3000 to see your app. This is not professional and can be a security risk. By setting up Nginx as a reverse proxy for your Node.js App on AWS, you create a formal gateway. Nginx will "catch" all traffic on the standard web port (80) and pass it internally to your Docker container.
In 2026, this architecture is highly valued because it allows Nginx to handle "handshakes," buffering, and security filtering, leaving your Node.js engine to focus purely on business logic and data processing.
1. Create a new Nginx configuration file:
We use a separate configuration file for your domain to keep the server organized. This is a best practice that allows you to host multiple apps on a single EC2 instance in the future.
2. Paste the following (replace your-domain.com with your actual domain):
This configuration block tells Nginx exactly where to send traffic. The proxy_set_header lines are crucial; they ensure that your Node.js app still knows the original user's IP address and host information, even though the request is technically coming from Nginx.
3. Enable the site and reload Nginx:
In Ubuntu, Nginx uses two folders: sites-available (where configs live) and sites-enabled (where active configs are linked). We create a symbolic link to "activate" your site, then test the syntax for errors before restarting the service.
Why is this configuration better?
- Clean URLs: Your users can now visit http://your-domain.com without needing a port number at the end.
- WebSocket Support: The Upgrade and Connection headers allow your Node.js App on AWS to support real-time features like WebSockets (Socket.io), which is essential for 2026's interactive web applications.
- Security Shield: By using proxy_pass, your Docker container is never directly exposed to the internet. Nginx acts as a "buffer," protecting your app from malformed requests and certain types of DoS attacks.
Enable SSL with Certbot (If You Have a Domain)
Securing your Node.js App on AWS is the final and most critical step in preparing for a production launch. In 2026, web security is non-negotiable; browsers will actively block or warn users against interacting with non-encrypted sites. By using Certbot, you are leveraging the power of Let’s Encrypt to provide industry-standard 2048-bit RSA encryption at no cost.
Before proceeding, ensure your domain name (e.g., example.com) has its A Record correctly pointed to your EC2 instance's Public IP address. Once the DNS has propagated across the globe, Certbot can perform a "challenge" to verify that you indeed own the server and the domain.
If you have a domain pointed to your EC2 public IP:
- Make sure DNS propagation is complete: You can use online tools like DNSChecker to verify that your domain is resolving to your AWS IP address globally.
- Run the following command: This command triggers the Certbot agent to communicate with the Let's Encrypt CA (Certificate Authority). The --nginx flag is a powerful shortcut that tells Certbot to automatically scan your /etc/nginx/sites-available/ directory, find the correct server_name, and modify the configuration for you.
Follow the prompts: Certbot will guide you through a brief interactive setup in your terminal. It will ask for an email address (to notify you if a renewal fails) and request that you agree to the terms of service.
Certbot will automatically perform the following actions:
- Domain Validation: It places a temporary file on your server to prove to Let’s Encrypt that you control the domain.
- Certificate Issuance: Once validated, it downloads your unique SSL certificate and private key files to /etc/letsencrypt/live/.
- Automatic Nginx Configuration: It updates your Nginx config file to listen on Port 443, applies the security certificates, and sets up a permanent 301 redirect. This ensures that any user trying to access the old http:// version of your site is automatically pushed to the secure https:// version.
- Auto-Renewal Setup: Let's Encrypt certificates are valid for 90 days. Certbot automatically adds a "timer" or "cron job" to your Ubuntu system that checks for expiration twice a day and renews the certificate whenever it is within 30 days of expiring.
What If You Don’t Have a Domain?
If you are still in the development or testing phase, you can still access and test your Node.js App on AWS using the public IP address provided by your EC2 instance. While you won't have the professional "look" of a custom domain, the functionality remains the same for internal team testing or performance benchmarking.
In 2026, many developers use this "IP-first" approach to ensure their Docker containers and Nginx configurations are working perfectly before committing to a domain purchase. It allows you to verify that the networking bridge between the cloud and your code is solid.
You can still test the app using the public IP:
- http://<your-ec2-public-ip>:3000 – Direct access: This connects you directly to your Node.js application, bypassing Nginx. This is useful for confirming that your Docker container is running correctly and listening on the expected port.
- http://<your-ec2-public-ip> – Access via Nginx proxy: Since Nginx listens on Port 80, typing just the IP address will hit the Nginx reverse proxy. If you see your app here, it proves that your Nginx proxy_pass configuration is correctly routing traffic to your container.
Important Considerations for IP-Based Testing:
- SSL Restrictions: SSL certificates (via Certbot/Let's Encrypt) will not work on public IPs. Certificates are issued to verify ownership of a domain name, not a specific IP address. Your connection will remain "Not Secure" until a domain is linked.
- Elastic IPs: Standard EC2 public IPs are "ephemeral," meaning they can change if you stop and start your instance. If you plan to test without a domain for a long period, you should allocate an Elastic IP in the AWS console and associate it with your instance to keep the address permanent.
- Security Group Rules: To access the app via Port 3000, you must ensure your AWS Security Group has an inbound rule allowing "Custom TCP" traffic on port 3000. For Port 80 (Nginx), ensure the HTTP rule is active.
- Temporary Hostnames: If you absolutely need to test SSL without buying a domain, you can explore free dynamic DNS services like DuckDNS or use nip.io (e.g., 1.2.3.4.nip.io). These provide a valid hostname that maps to your IP, which Certbot can sometimes use for temporary certificates.
Final Notes for Your Node.js App on AWS
Successfully deploying a Node.js App on AWS is a significant milestone, but maintaining a production-grade environment requires ongoing attention to costs, stability, and security. As you move beyond the initial setup, consider these professional best practices to ensure your application remains robust in 2026.
- Manage Costs Efficiently: Stop Idle Instances:
AWS bills by the hour or second, depending on the instance type. If your Node.js App on AWS is a development or staging project, stop the EC2 instance when it's not in use to halt compute charges.- Monitor EBS Snapshots: Even if an instance is stopped, you are still charged for the attached storage (EBS). Regularly audit your volumes and snapshots to avoid "zombie" costs.
- Implement Persistence with Elastic IP:
By default, AWS assigns a "Public IPv4" address that changes every time the instance is stopped and restarted. This can break your DNS records and SSL configuration.- Assign an Elastic IP: This is a static, reserved public IP address. Once associated with your instance, it stays the same regardless of reboots, ensuring your Node.js App on AWS remains reachable at the same address indefinitely.
- Leverage IAM Roles for Security:
* Avoid hardcoding AWS Access Keys (Access Key ID and Secret Access Key) inside your Node.js code or .env files. This is a major security risk.- Use IAM Instance Profiles: Attach an IAM Role directly to your EC2 instance. The AWS SDK for Node.js will automatically pick up these permissions, allowing your app to securely interact with other services like S3 or DynamoDB without needing manual credentials.
- Use IAM Instance Profiles: Attach an IAM Role directly to your EC2 instance. The AWS SDK for Node.js will automatically pick up these permissions, allowing your app to securely interact with other services like S3 or DynamoDB without needing manual credentials.
- Advanced Monitoring with CloudWatch: Performance Metrics:
Use Amazon CloudWatch to track CPU utilization, memory usage, and disk I/O. Set up "Alarms" to notify you via email if your instance hits 80% CPU for more than 5 minutes.- Centralized Logging: Install the CloudWatch Logs agent on your Ubuntu server. This pushes your Nginx and Node.js Docker logs to a central dashboard, allowing you to debug issues without needing to SSH into the server every time.
- Automate with Backups and Updates: Snapshot Regularly:
Schedule automated EBS snapshots. If a deployment goes wrong or a container becomes corrupted, you can restore your entire server to a previous "known good" state in minutes.- Stay Updated: Set a monthly schedule to run sudo apt update && sudo apt upgrade on your host machine to ensure your Nginx and Docker versions include the latest 2026 security patches.
Conclusion
By following this guide, you’ve successfully navigated the modern cloud landscape to launch a secure, high-performance environment. You have moved from a local setup to a professional architecture by launching an EC2 instance, containerizing your application with Docker for ultimate portability, and configuring Nginx as a robust reverse proxy. With the integration of Certbot, your Node.js App on AWS is now protected by industry-standard encryption, ensuring both user safety and search engine visibility.
This deployment stack is the foundation for any scalable web project in 2026. However, as your application grows, you might find the need for specialized expertise to optimize your architecture, implement CI/CD pipelines, or manage complex microservices. To scale your engineering capacity effectively, many businesses choose to Hire Node.js Developers who specialize in cloud-native technologies and AWS optimization. Whether you are building a startup or an enterprise-grade platform, having the right talent ensures your infrastructure remains reliable as your traffic increases.
Every expert was once a beginner. Keep building, experimenting, and refining your stack to stay ahead in the ever-evolving world of web development.
Ready to take your project to the next level? Whether you need technical consulting or a dedicated team to manage your cloud infrastructure, we are here to help. Contact Zignuts today to discuss how we can turn your vision into a scalable, secure, and high-performing reality.


.webp)
.webp)
.webp)
.webp)
.webp)
.webp)
.png)
.png)
